iOSのUIをコードで追加して配置する
5回ググって書く気が失せたのでBlogged.
// https://qiita.com/i_terasaka/items/2cf7d0f7146f32c3f2c1#%E5%8F%96%E5%BE%97%E6%96%B9%E6%B3%95
let button = UIButton(type: UIButtonType.system)
button.frame = CGRect(x: 180, y: 50, width: 100, height: 40)
button.setTitle("button", for: UIControlState.normal)
button.accessibilityIdentifier = "button" // XCUITest用
button.addTarget(self, action: #selector(ViewController.someAction), for: UIControlEvents.touchUpInside)

self.view.addSubview(button)

// https://qiita.com/on0z/items/9768d2bccc29cc4e1851
var wkWebView : WKWebView!
wkWebView = WKWebView(frame: CGRect(x: 100, y: 100, width: self.view.frame.size.width / 2, height: self.view.frame.size.height / 2))
self.view.addSubview(wkWebView)

// 初期化メソッドに差はない
var uiwebview : UIWebView!
uiwebview = UIWebView(frame: CGRect(x: 100, y: 120 + self.view.frame.size.height / 4 , width: self.view.frame.size.width / 2, height: self.view.frame.size.height / 4))
        self.view.addSubview(uiwebview)
参考
合わせて読みたい
iOSでBundleファイルを扱う
.bundle拡張子のついたフォルダーを用意- その下にファイルを置く
.bundle拡張子のついたファイルをXCode上で追加したいプロジェクトに追加- 下記のように
NSStringやNSData,UIImageなどの関数でデータを読み込む
NSString* filePath = [NSString stringWithFormat:@"%@/%@",  [[NSBundle mainBundle] pathForResource:@"test" ofType:@"bundle"], FILE_NAME];
NSString* content = [NSString stringWithContentsOfFile:filename encoding:NSUTF8StringEncoding error:nil];
NSLog(@"content: %@", content);

NSData *contentData = [NSData dataWithContentsOfFile:filePath
                                              options:NSDataReadingMappedIfSafe
                                                error:nil];

[UIImage imageNamed:filePath];
参考
今日のAWS
terraform ちょっとだけ触りました
resource "aws_s3_bucket", "woshidan-terrafom-test" { # 追加する種類のリソース, リソース名
    # s3の場合
    bucket = "woshidan-terrafom-test"
    path   = "/"
    acl = "private"
    # acl = "..." で設定しているのはAWS側によってあらかじめ定義された既定ACL
    # privateはデフォルト設定。所有者はすべての権限を持つが他のユーザにアクセス許可はない
    # http://docs.aws.amazon.com/ja_jp/AmazonS3/latest/dev/acl-overview.html#canned-acl
    # 既定ACLに付け加えて記載するポリシー. JSON形式で書く
    policy = << POLICY
{
    "Version": "2012-10-17",
    "Statement": [
        {
            "Effect": "Allow",
            "Action": "aws-portal:View*",
            "Resource": "*"
        }
    ]
}
POLICY
}
AWS S3のACL
http://docs.aws.amazon.com/ja_jp/AmazonS3/latest/dev/acl-overview.html
AWS S3 アクセスコントロールリスト(ACL)では、バケットとオブジェクトへのアクセスを管理ができる。各バケットとオブジェクトにはサブリソースとしてACLが付与されていて、ACLには
- 所有者
- 被付与者(AWSアカウントまたはグループ)
- 付与されたアクセス許可
の要素がある。
PolicyとPolicy Attachment
Policyのリソース( aws_iam_policy )は別個に定義することができて、下記のようにさらにAttachmentリソースの定義でユーザーやグループと結びつけることで、管理画面でやるようにユーザーが所属するグループの食い合わせによってそのユーザーが持っている権限が定義される、というような管理の仕方ができそう。
resource "aws_iam_policy" "WoshidanTerraformTestFullAccess" {
    name   = "WoshidanTerraformTestFullAccess"
    path   = "/"
    description = "terraform hello world"
    policy = <<POLICY
{
  "Version": "2012-10-17",
  "Statement": [
    {
      "Effect": "Allow",
      "Action": "s3:List*",
      "Resource": "arn:aws:s3:::*"
    },
    {
      "Effect": "Allow",
      "Action": [
        "s3:GetObject*",
        "s3:DeleteObject*",
        "s3:PutObject*"
      ],
      "Resource": [
        "arn:aws:s3:::woshidan-terrafom-test/*"
      ]
    }
  ]
}
POLICY
}
resource "aws_iam_policy_attachment" "WoshidanTerraformTestFullAccess" {
  name = "WoshidanTerraformTestFullAccess"
  users = [...]
  roles = []
  policy_arn = "${aws_iam_policy.WoshidanTerraformTestFullAccess.arn}"
}
Cocos2d-x用の日本語対応フォントファイルをGlyph Designer2を使って書き出し
Glyph Designer 2 の入手
Glyph Designer - A Bitmap Font Generator for Mac · 71Squared
よりDLした後、ライセンス(月900円~)を購入してアクティベイトキーを入力。
日本語フォントの追加
【cocos2d/unity3d】簡単に日本語表示用のフォントが作れる「GlyphDesigner」の使い方 | albatrus.comを参考にしつつ、 Font Systems のアプリケーションから利用したいフォントのフォルダを開いて、フォントファイル (.otf)を Glyph Designer 2 から開くことができるパスへコピーします。

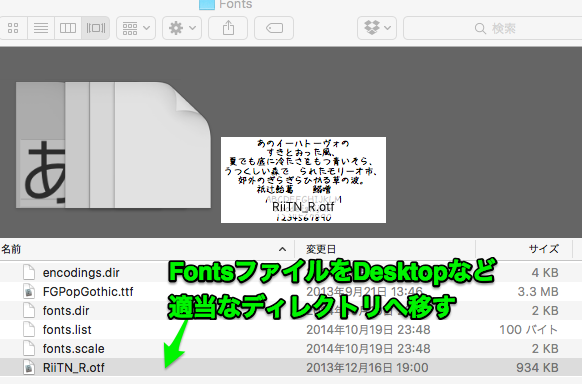
なお、今回利用させていただいたフォントはこちらのりぃ手書きNです。

そのフォントを Glyph Designer 2 のメニューの File > Load Font で開きます。
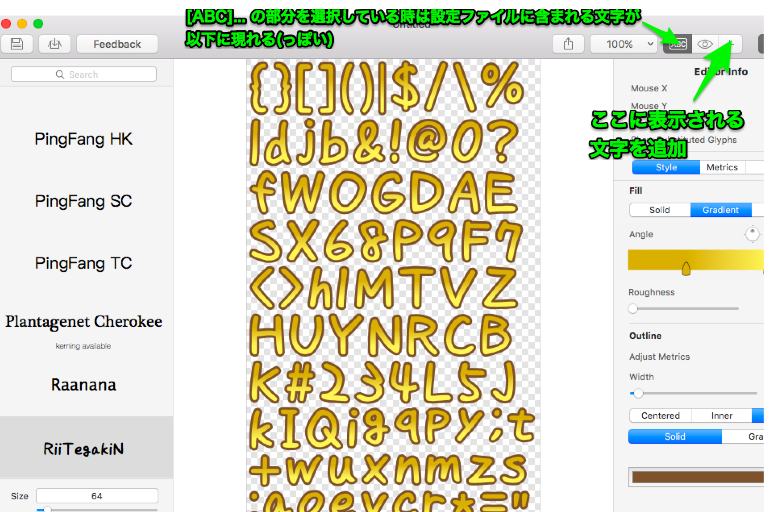
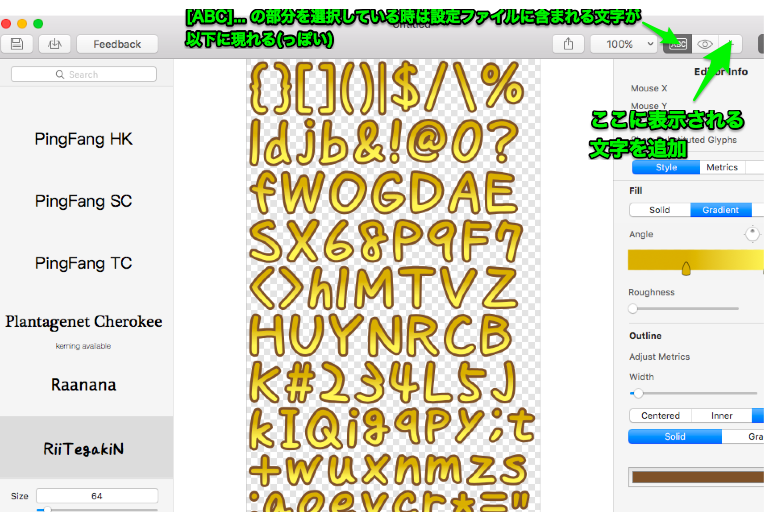
すると以下のように利用可能なフォントとして追加されます。
設定ファイル上で日本語を利用できるようにする
このままでは設定ファイルは以下の文字しか対応していません。ゲーム上で利用した場合、日本語は利用できなくなっています。
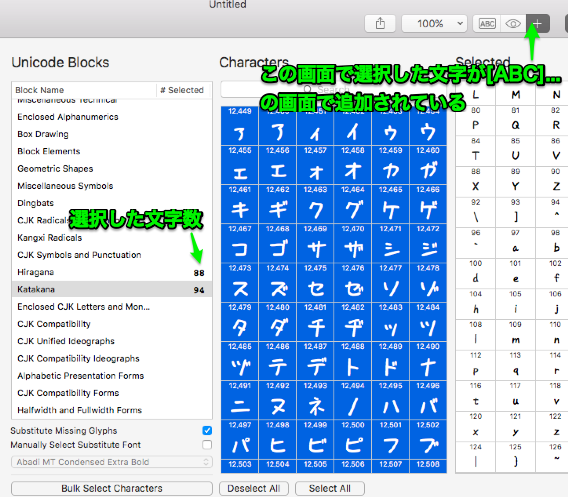
それでは困るので、フォントの設定にひらがなとカタカナを利用可能な文字として追加することにします。

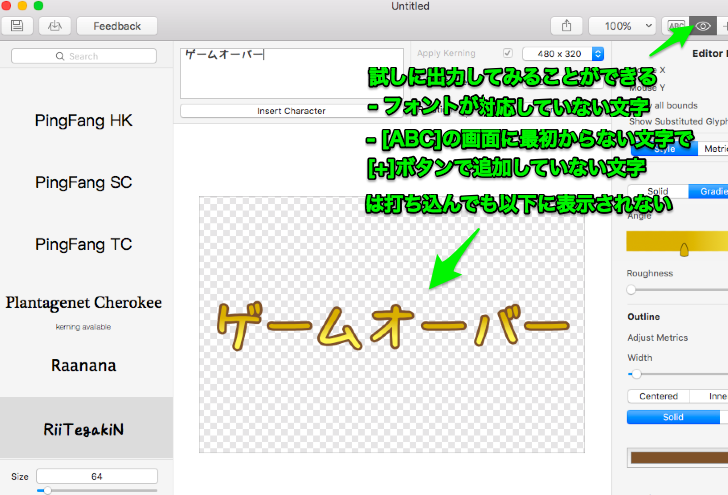
真ん中の目のアイコンを押すとプレビュー画面が開き、実際にフォントを利用した場合の様子を試すことができます。
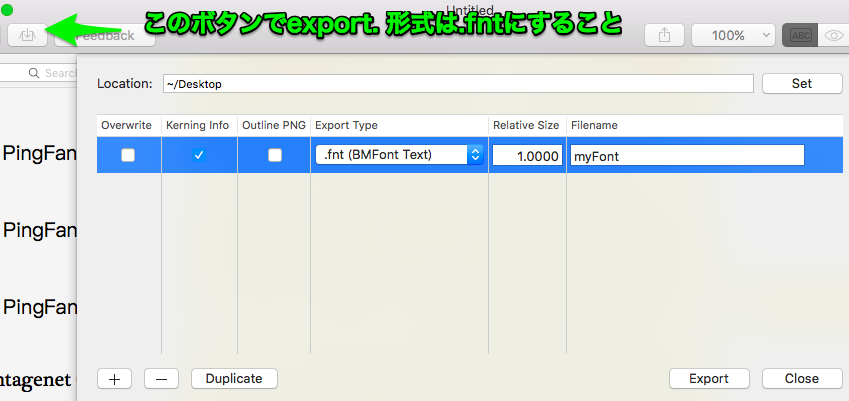
設定ファイルのexport
esaやGitHubに検証結果貼りつけたいが、 tableタグや img タグなど書くのが面倒な時用のスニペット
esaやGitHubに検証結果貼りつけたいが、 img タグなど書くのが面倒な時用のスニペット。
出力用コード
require 'yaml'
require 'erb'

puts ARGV[0]

file    = File.open ARGV[0]
raw_str = file.read
@tests  = YAML.load(raw_str)

template_path = File.expand_path('template.erb', File.dirname($0))
erb = ERB.new(File.new(template_path).read)

puts erb.result(binding)
erbテンプレート
<!-- HTML -->
<% @tests.each do |test| %>

<h3><%=  test["title"] %></h3>

<table>
   <tr>
      <td>
      </td>
        <%  test["rows"].each do |row| %><th>
                <%= row %>
            </th><% end %>
  </tr>
    <% test["cols"].each do |col| %><tr>
        <th>
            <%= col %>
        </th>
      <%  test["rows"].each do |row| %><td>
          <% if test["with_image"] %>
            <img src="" alt="<%= "#{col} x #{row}" %>" width="<%= test["image_width"] %>px" />
            <% end %>
        </td>
      <% end %></tr>
    <% end %>
</table>

<% end %>
# Markdown
<% @tests.each do |test| %>

### <%=  test["title"] %>

|   <%  test["rows"].each do |row| %>|<%= row %><% end %>|
|---<%  test["rows"].each do |row| %>|---<% end %>|
<% test["cols"].each do |col| %>|<%= col %><%  test["rows"].each do |row| %>|<% if test["with_image"] %> <img src="" alt="<%= "#{col} x #{row}" %>" width="<%= test["image_width"] %>px" /><% end %><% end %>|
<% end %>
<% end %>
使い方
$ ruby build_table.rb sample.yml
入力として用意するYAML
- with_image: true
  image_width: 100
  title: AとBの条件についてテスト(要スクショ)
  rows:
    - A = 1
    - A = 2
    - A = 3
    - A = 4
    - A = 5
  cols:
    - B = 1
    - B = 2
    - B = 3
- with_image: false
  title: AとBの条件についてテスト(スクショ不要)
  rows:
    - A = 1
    - A = 2
  cols:
    - B = 1
    - B = 2
    - B = 3
    - B = 4
出力
HTML
<h3>AとBの条件についてテスト(要スクショ)</h3>

<table>
   <tr>
        <td>
        </td>
        <th>
                A = 1
            </th><th>
                A = 2
            </th><th>
                A = 3
            </th><th>
                A = 4
            </th><th>
                A = 5
            </th>
    </tr>
    <tr>
        <th>
            B = 1
        </th>
        <td>

              <img src="https://cdn-ak.f.st-hatena.com/images/fotolife/w/woshidan/20171018/20171018132818.png" alt="B = 1 x A = 1" width="100px" />

        </td>
        <td>

              <img src="" alt="B = 1 x A = 2" width="100px" />

        </td>
        <td>

              <img src="" alt="B = 1 x A = 3" width="100px" />

        </td>
        <td>

              <img src="" alt="B = 1 x A = 4" width="100px" />

        </td>
        <td>

              <img src="" alt="B = 1 x A = 5" width="100px" />

        </td>
        </tr>
    <tr>
        <th>
            B = 2
        </th>
        <td>

              <img src="" alt="B = 2 x A = 1" width="100px" />

        </td>
        <td>

              <img src="" alt="B = 2 x A = 2" width="100px" />

        </td>
        <td>

              <img src="" alt="B = 2 x A = 3" width="100px" />

        </td>
        <td>

              <img src="" alt="B = 2 x A = 4" width="100px" />

        </td>
        <td>

              <img src="" alt="B = 2 x A = 5" width="100px" />

        </td>
        </tr>
    <tr>
        <th>
            B = 3
        </th>
        <td>

              <img src="" alt="B = 3 x A = 1" width="100px" />

        </td>
        <td>

              <img src="" alt="B = 3 x A = 2" width="100px" />

        </td>
        <td>

              <img src="" alt="B = 3 x A = 3" width="100px" />

        </td>
        <td>

              <img src="" alt="B = 3 x A = 4" width="100px" />

        </td>
        <td>

              <img src="" alt="B = 3 x A = 5" width="100px" />

        </td>
        </tr>

</table>


<h3>AとBの条件についてテスト(スクショ不要)</h3>

<table>
   <tr>
        <td>
        </td>
        <th>
                A = 1
            </th><th>
                A = 2
            </th>
    </tr>
    <tr>
        <th>
            B = 1
        </th>
        <td>

        </td>
        <td>

        </td>
        </tr>
    <tr>
        <th>
            B = 2
        </th>
        <td>

        </td>
        <td>

        </td>
        </tr>
    <tr>
        <th>
            B = 3
        </th>
        <td>

        </td>
        <td>

        </td>
        </tr>
    <tr>
        <th>
            B = 4
        </th>
        <td>

        </td>
        <td>

        </td>
        </tr>

</table>
esaに貼り付けてみたときの見た目

画像入れてく部分は画像が入ってなかったらaltに条件の文字列入れてるのでどの条件のテスト終わってないかわかりやすい。
XCodeのRun Scriptを試しに触ってみる
iOS用アプリケーション、ライブラリのビルド前後にちょっと作業がしたい場合、XCodeの Run Script でシェル(やシェル経由で起動できる各種言語のプログラム)を起動させることができます。
今日はちょっと試してみました。
簡単なスクリプトの実行
# hello.sh
echo "hello"
こういう超簡単なスクリプトを用意して、

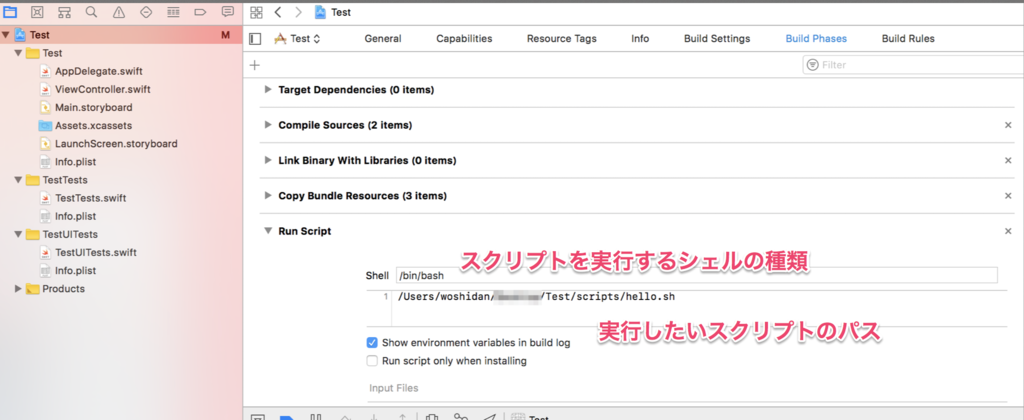
上図のように、実行したいスクリプト hello.sh のパスを設定すると、ビルド時のログに hello と出力されます。
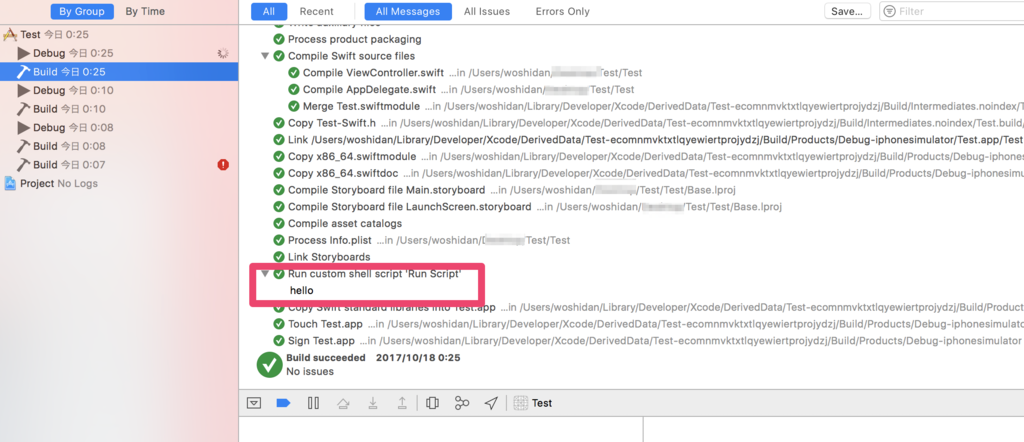
スクリプトのパスを指定する代わりにそのまま書く
以下のようにそのまま実行したいスクリプトをベタがきすることも可能です。

上記を実行すると

ちょっとビルド自動化の際など環境変数を調べたいときに便利そうです。
指定したファイルのパスを変数に与えて実行
下の方の欄にある input files にファイルのパスを与えると、スクリプト中にて $SCRIPT_INPUT_FILE_N (Nは数字) という変数名で取得可能です。ちょっとやってみましょう。
// Test.xcodeproj/project.pbxprojの冒頭
// !$*UTF8*$!
{
    archiveVersion = 1;
    classes = {
    };
    objectVersion = 48;
    objects = {
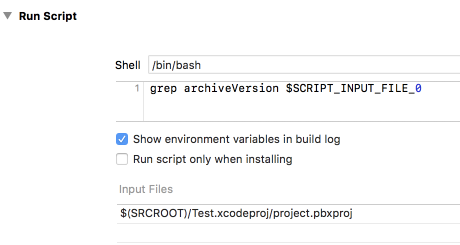

出力結果の2行目はビルド時に書き加えられたものです。 Run Script の中に書いたスクリプトや実行ファイルのパスは XCode のプロジェクト設定ファイルの中に記録され、管理されます。
スキームごとに接続先などを変更したいけど、コードの中に残したくない、という場合*1などに置換処理を行ったりできるのではないでしょうか。
現場からは、以上です。
参考
- http://jpmartha.hatenablog.jp/entry/2016/02/18/141028
- https://qiita.com/kakignu/items/352aa1d11eb46bc202c2
- http://geme.github.io/xcode/2016/10/27/BuildPhaseLoopOverInput.html
*1:書いてみたけどコードの中に残した方が人間が読む上で素直な気がする
